Introduction
Skills Required: Basic JQuery, HTML & CSS
Difficulty: Easy
Previously, I’ve released a copy of my JQuery + CSS Slideshow for everyone to download, here. A few days later, I figured besides sharing, I could probably teach a thing or two of it. As simple as it is, if you’re able to finish up something like that, you will have no problem doing your very own slideshow in future!
What You Will Be Doing

How confusing can it get? Well, if you have experience in JQuery, basic HTML and CSS, you’ve nothing to be afraid of then! Really, it requires just basic knowledge of the languages to make it work. Only problem is, figuring out the “How”. So, let’s get started shall we?
Download Script v1.1 ↓View Demo
HTML & CSS
To even begin buildiing the mechanism of the slideshow, we need to visualize its layout. So go ahead and start setting up the page.
Slideshow Layout in HTML
<div id=”container”>
<div id=”header”>
<h1>CSS + JQuery Sliding Gallery</h1>
</div><!- – end of #header – ->
<div id=”main”>
<div id=”actions”>
<a href=”#” id=”previous”>Previous</a>
<a href=”#” id=”next”>Next</a>
</div>
<ul id=”slideshow”>
<li>
<img src=”images/flow 1.jpg” alt=”Slide01″ />
<p>Slide #01. This is a sample text.</p>
</li>
<li>
<img src=”images/flow 2.jpg” alt=”Slide02″ />
<p>Slide #02. This is a sample text.</p>
</li>
<li>
<img src=”images/flow 3.jpg” alt=”Slide03″ />
<p>Slide #03. This is a sample text.</p>
</li>
</ul>
</div><!- – end of #main – ->
</div> <!- – end of #container – ->
The slides are contained in an Unordered List, with each image inside a LI element. We shall be using the container “#main” as the holder for each of the slides. In other words, the restrictor for the size. By placing the container “#slidehsow” evenly on each side using position absolute, we now form a border around the slides. Let’s set the width of each image to 100% so that it scales along with the container “#main” for flexibility. As you can see, We have 2 other links, the “Next” and “Previous” buttons, which are just set outside the Unordered List. This is so that it will be unobtrusively place itself within the container “#main” and not bother the unordered list areas. Now, let’s move on to the CSS portion, which you will get a clearer picture of the explanation above.
Slideshow Styling in CSS: CSS Reset
/*===============================================
CSS TOTAL RESET
===============================================*/
html, body, div, span, applet, object, iframe,h1, h2, h3, h4, h5, h6, p, blockquote, pre,a, abbr, acronym, address, big, cite, code,del, dfn, em, font, img, ins, kbd, q, s, samp,small, strike, strong, sub, sup, tt, var,dl, dt, dd, ol, ul, li,fieldset, form, label, legend,table, caption, tbody, tfoot, thead, tr, th, td {
margin: 0;
padding: 0;
border: 0;
outline: 0;
font-weight: inherit;
font-style: inherit;
font-size: 100%;
font-family: inherit;
vertical-align: baseline;
}
:focus {
outline: 0;
}
This set of codes, as the comment stated, will reset some of the default styling inconsistency between different browsers to 0 or none. In other words, standardizing them. Moving on to the element styling.
Slideshow Styling in CSS: Global Elements
/*===============================================
GLOBAL ELEMENTS
===============================================*/
body, html {
padding: 20px;
font-family: Georgia, Helvetica, Verdana;
font-size: 12px;
background: #111;
color: #fff;
}
h1 {
font-size: 35px;
text-align: center;
text-shadow: 0 1px 1px #111;
}
img {
width: 100%;
height: 100%;
}
a {
color: #555;
text-decoration: none;
z-index: 10;
}
a:hover {
color: #222;
}
p {
position: absolute;
margin-top: -110px;
padding: 10px;
width: 100%;
height: 100%;
background: rgba(11,11,11, 0.7);
}
.button { //USED FOR THE ACTION LINKS
padding: 10px 20px;
background: #eee;
}
.next { //POSITIONING OF “NEXT” LINK
float: right;
margin-right: 20px;
}
.prev { //POSITIONING OF “PREVIOUS” LINK
float: left;
}
.box-shadow-up { //UPWARDS BOX SHADOW
-o-box-shadow: 0 -1px 5px #222;
-moz-box-shadow: 0 -1px 5px #222;
-webkit-box-shadow: 0 -1px 5px #222;
box-shadow: 0 -1px 5px #222;
}
.box-shadow { // NORMAL BOX SHADOW
-o-box-shadow: 0 2px 5px #000;
-moz-box-shadow: 0 2px 5px #000;
-webkit-box-shadow: 0 2px 5px #000;
box-shadow: 0 2px 5px #000;
}
As you can see, its pretty straight-forward. Very much what you may have learned in the school and the usuals. The only new things are the CSS3, such as box shadow and RGBA. You may notice that I had seperated each and every elements with their own class, such as box-shadow, button, etc. The reasons for such effort is to better organize your styling. IDs are generally used for javascript or php to identify an element, so it is always a good practice to separate designing and styling from positioning and defaults. In other cases, it could also be a certain same set of styling will be re-used again and again. Instead of increasing the length and size of your stylesheet, a smarter way would be to use a class to attach the same set of styles to different elements.
Slideshow Styling in CSS: Slideshow Elements
/*===============================================
SLIDESHOW ELEMENTS
===============================================*/
#container #main {
position: relative;
padding: 10px;
margin: 30px auto 20px;
width: 800px;
height: 400px;
background: #eee;
}
#container #main #actions { /*POSITIONING OF LINKS */
position: absolute;
top: 50%; /*POSITION AT CENTER */
margin-top: -25px; /*OFFSET ITS HEIGHT */
width: 100%;
z-index: 10;
}
The “#action” ID are used for the “previous” and “next” links, that shall change the slides. In this case, I would like to position them in the center so that it would be more noticeable. In order to do that, I used a simple line of code to achieve centered positioning: “top: 50%”. If you have done that, you would notice that it isn’t exactly centered. That’s because our links have a size rather than a single line. So to offset that, we set its margin-top to -25px.
#container #main #slideshow {
position: absolute;
/* POSITION TO LEAVE 10PX BORDER */
top: 10px;
bottom: 10px;
left: 10px;
right: 10px;
background: #fefefe;
list-style: none;
overflow: hidden; /* HIDE CONTENTS */
}
#container #main #slideshow li {
/* TAKING THE SIZE OF THE SLIDESHOW */
width: 100%;
height: 100%;
overflow: hidden;
}
By setting the #slideshow’s Top, Right, Bottom, Left to 10px, not only does it create a 10px border-like, it also allows the slideshow to inherit the size of its outer container “#main”.
JQuery
Having the layout and looks setup, we are now ready to move on to developing the slideshow’s mechanism. First, Let’s declare some of the variables for easier calling later on.
Slideshow’s Mechanism
// DECLARING VARIABLES FOR EASIER CALLING
var slideshow = $(‘#slideshow’),
main = $(‘#main’),
actions = $(‘#actions’),
next = $(‘#next’),
previous = $(‘#previous’),
desc = slideshow.find(‘p’);
It’s pretty self-explanatory as well if you know basic JQuery. Next, we shall start declaring the function for the mechanism.
(function($) {
$.fn.slider = function(settings) {
//THE DEFAULT SETTINGS FOR THE SLIDESHOW
var defaults = {
speed: 800,
actions: true,
width: 800,
height: 400
};
//EXTEND THE SETTINGS SO USER MAY CUSTOMIZE
var settings = $.extend(defaults, settings);
What this does is basically, to declare a set of given settings with default values, and then extend it to allow users to customize it by setting their own values. The extend is an API of JQuery’s massive library, that allows the merging the contents of 2 or more objects together into the first object in its parameter.
//CHANGE THE SIZE OF THE SLIDESHOW
//TO THE SIZE USER DECLARED IN SETTINGS
main.css({
“height”: settings.height,
“width”: settings.width
});
Of course, when you allow the users to set their own values, you need to apply them to make changes. The first basic settings to apply would be its width and height. So to call on the values declared in the settings, we use “settings.width” or “settings.height”, where “settings” is the variable’s name you used.
function animation(action) {
//IF USER CLICKS ON NEXT LINK
if(action == “next”) {
//HIDE THE FIRST SLIDE
$(‘li:first’).animate({
height: 0,
opacity: 0
}, settings.speed, function() {
//SHOW IT WHEN ITS APPEND TO
//THE BOTTOM OF THE LIST
$(this).animate({
height: settings.height,
opacity: 1
}, ‘fast’);
//REMOVE SLIDE AND APPEND AT THE BOTTOM
$(this).remove().appendTo(slideshow).show();
});
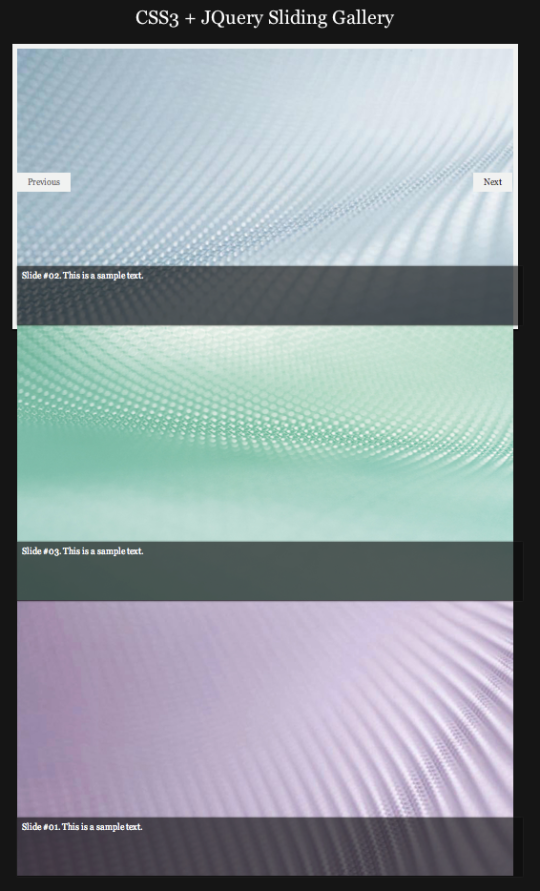
This function handles all the animation you would see in the slideshow. The parameter passes the direction in which the slideshow should animate. If the user presses “next” then the slide that is currently showing will have its height and opacity reduced. On its second part, you notice that the height is now set back to “settings.height” and opacity 1. That’s because we would still want the slide appeared as the last of the list of slides, but hidden. As processed by the last line, this slide will be removed and then append back to “#slideshow” as the last one, and shown with “show();”. Sounds confusing? Well not really if you’re able to visualize it. I shall assist you in doing that with the snapshot examples below:
Before Clicking Next:

After Clicking Next:

} else {
//HIDE THE LAST SLIDE
$(‘li:last’).css({“height”:”0″,”opacity”:”0″});
//REMOVE THE LAST SLIDE AND
//PREPEND AS THE FIRST SLIDE
$(‘li:last’).remove().prependTo(slideshow);
//ANIMATE AND SHOW THE SLIDE
$(‘li:first’).animate({
height: settings.height,
opacity: 1
}, settings.speed);
}
}
If user clicks on “previous” link, this set of codes will be activated. What it does is basically a reversed flow of the “next” animation. It hides the slide on the last of the list, removed it and prepend it back to “#slideshow”. The key in this animation is prepend and append. The difference is prepend inserts it on the top/first in the list while append inserts it on the last/bottom of the list(Look it up on JQuery’s Documentation). Once prepended, it will then animate to the given set of height and opacity 1.
Following So Far?
Well, it wasn’t that difficult right? If you can visualize it, its pretty easy to do a simple slideshow. The major bits are done, and we are left with tweaks and the action links.
// ONCLICK EVENT FOR NEXT SLIDE LINKS
next.click(function() {
animation(‘next’);
return false;
});
// ONCLICK EVENT FOR NEXT SLIDE LINKS
previous.click(function() {
animation(‘previous’);
return false;
});
It’s pretty straight-forward here. We bind the click events to the action links and call the function with the parameter of the direction. Returning false will prevent the page from re-loading.
//HIDE AND SHOW THE LINKS IF ACTIONS IS TRUE
if(settings.actions) {
actions.css({“opacity”:”0″});
// MOUSE ENTER EVENT FOR ACTIONS TO APPEAR AND DISAPPEAR
main.mouseenter(function() {
actions.stop().animate({
opacity: 1
}, ‘fast’);
}).mouseleave(function() {
actions.stop().animate({
opacity: 0
}, ‘fast’);
});
}
}
})(jQuery);
Here, we check to see if user allows the “action” setting to be “true”. If so, we will hide the links on initial loading, and only appears when the mouse hovers over the “#main” container. Simple as that!
Conclusion
This is a simple tutorial to explain how a basic slideshow is done. With the newly introduced CSS3, many new creative slideshows are appearing, such as rotation, scaling, etc. Slideshow is very common nowadays and is used for many different purposes. Its generally pleasing to see with minimal effects, and helps to feature some of the content a website or blog has for their users.
Do you enjoy this tutorial I compiled for you? If you do, I would really appreciate if you share it with others through the social media below! Thank you!
Download Script v1.1 ↓
Related Post
JQuery & CSS3 Slideshow on 28 Dec 2010.


